A Beginner’s Guide To Gold Panning
Note: This story appears is in the May issue of Alaska Sporting Journal
By Steve Herschbach
Strike it rich! Many people would like to find a little gold. To find gold, a beginner needs nothing more than a gold pan and some basic tools.
The best way to learn how to pan for gold is to first get the right kind of gold pan. The steel gold pans of old are still made, but most actual miners and prospectors these days use plastic gold pans. The colored plastic pans show the gold better than the shiny surface of a steel pan, and plastic pans can be molded with “cheater riffles” that make it easier to pan and still not lose the gold.
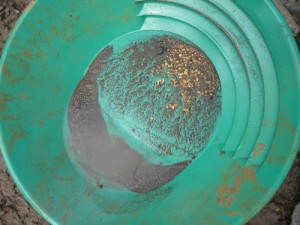
In general green is considered one of the best colors for a gold pan, as it contrasts well both with the gold and the sand from which the gold is being liberated. A 14-inch gold pan is about the right size for most adults, while most children would probably be better served with a 10-inch pan.
In good hands, the pan is one of the most efficient devices available for gold recovery. There is some skill involved in gold panning, however, and the big mistake most people make is in not learning how to pan before going out for the first time.
Find a tub large enough to move the pan around inside the tub. Obtain a few flakes of gold, or lacking gold, and use a small flattened lead shot. The gold or lead flakes should be about 1/16 of an inch in diameter or smaller. Fill the tub with water, and fill the pan level to about 1 inch short of the top with sand, gravel, and small rocks. Some actual stream gravels are best. Carefully count out a number of lead or gold pieces and push them into the material in the pan. This is the key thing about this process. It is necessary to start with a known number of pieces in order to gauge how well the panning process is going. Ten flakes is a good number to use.
THERE ARE LOTS of ways to pan, but all that is important is getting rid of that sand and gravel while keeping those sample pieces. Submerge the pan just below the surface of the water, and allow the water to soak into the material. It may be necessary to stir the material up somewhat to wet all the material in to pan. Pick out any larger rocks at this time. Then shake the pan vigorously side to side and front to rear, all the while keeping it just under the water and basically level.
The goal is to get all the material in the pan moving vigorously and very soupy. The gold or lead is much heavier than an equal size piece of sand, and so with all the material moving around the test samples will quickly sink to the bottom of the pan.
The next step involves taking the pan of material and tilting it forward, away from the panner, and scooping some water up out of the tub. The goal is to try and make a wave similar to that seen on a beach. Scoop the pan into the water and then lift the pan while tossing the water away. The water should ride up the tilted pan, and then as the water flows back out of the pan it will carry some material out with it.
The secret is in keeping the material in the bottom of the pan stationary and letting the water wash off the top layer in the pan. Do not dump the material out of the pan; wash it out of the pan. Three or four of these “scoop and toss” washing actions take place. Then the pan goes back to the level/submerged position for another round of vigorous shaking. Then back up, tilt forward, and scoop/wash the material. Repeat this action until only a few spoonfuls of material remain in the pan. You can be vigorous at first, but get more careful the less material remaining in the pan. Watch the material carefully while washing for a glint of gold or lead. If a piece is seen, stop and shake it back down into the bottom of the pan. If the pieces are seen often, it means the shaking action has not been vigorous enough to sink the samples to the bottom of the pan.
More care must be used when washing as the last bit of material remains in the pan. One wrong move and everything in the pan will go in the tub! When only a spoonful of material remains, swirling the material around in the bottom of the pan with a small amount of water will reveal the pieces of gold (or lead).
A very handy tool at this point is the snuffer bottle, which is a plastic squeeze container with a tube inserted into in such a fashion that small items can be sucked into the bottle but can’t escape. This makes it easy to spot the flakes, and then suck them up while getting as little sand as possible. When all the pieces have been captured, dump material still in the pan into the tub. Then take the cap off the snuffer bottle and dump out the captured pieces back into the pan. It should now be very easy to separate the test samples from the tiny amount of sand remaining.
Now count them! All the original test pieces should be captured. If not, rinse everything out of the tub back into the pan and start all over. The first goal is to get to where all the test pieces are reliably recovered every time. When that point is reached, the next goal is to try and pan faster, to speed up the process. Beginning panners take incredible amounts of time on a single pan when they are learning, sometimes 15 to 20 minutes or more. But with practice it should take no more than a few minutes to work a pan of material. Gold panning championships are measured in seconds, not minutes.
If this kind of practice does not take place before going out to do some actual gold panning, the chances for any kind of success are very minimal. The new prospector will have no idea if there wasgold in the material they have chosen to pan. When nothing is found, they will be unsure if it is because of poor panning technique or just because there was no gold to start with. It is very important to have confidence so that when a particular spot is sampled with a pan a few times and nothing is found, the decision can be made to try panning somewhere else.
Other items handy for gold panning are rubber gloves for protection from cold water, rubber boots, a small shovel or large scoop, a small pry bar and, of course, a snuffer bottle. Be sure to have a bottle to put the gold in. Do not use glass, as it can be too easily dropped and broken. An optional item that can be a real aid is a half-inch screen. Screen the material into the pan while underwater, carefully washing, and then discarding the larger rocks. This speeds things considerably and makes panning easier. Dump the rocks next to you where you can spread them and look for a large nugget that did not go through the screen. Large nuggets are rare, but it could happen!
NEXT IS THE question of where to go gold panning. Always attempt to go where gold has already been found, as stumbling on an unknown gold deposit is not likely to happen. Be sure that the area is open to the public, or that permission is obtained from whoever has jurisdiction over the property. For most visitors with limited time, it will be best to stick with known public sites. These can be easily found on the internet.
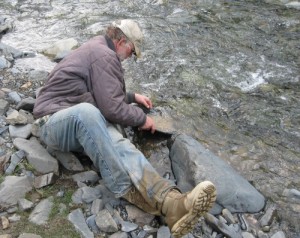
When panning, it usually will make more sense to spend extra time and effort filling the pan with quality material. For example, splitting bedrock crevices and cleaning them thoroughly can take some time, but the material produced will usually have a better chance of producing a good showing of gold than simply filling the pan with a couple shovels full of bank material. Panning can produce substantial amounts of gold, but the material must be chosen carefully for good results. Good luck, and good panning!
Editor’s note: Steve Herschbach operates the gold website detectorprospector.com. Email him at contact@detectorprospector.com

Flight Of The Fledglings

Sweet Deals On Two Most ‘Overlooked’ Weeks At Katmai Lodge